
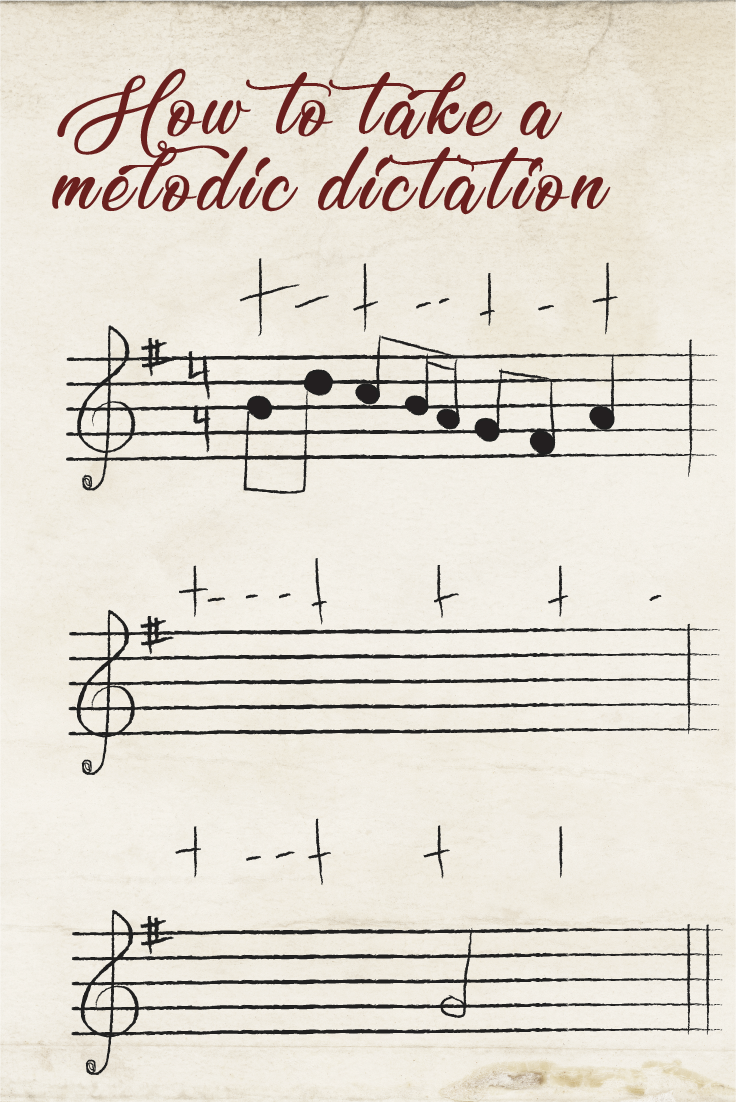
How to take a Melodic Dictation
Figuring out how to successfully take a melodic dictation can be one of the most intimidating events for a new music student. Many students find it to be quite overwhelming and need a bit of help to figure out where to start. Having a melodic dictation strategy – and following that strategy every time – is one of the most important keys to success.
A melodic dictation strategy gives you a structure to follow and will keep you from throwing random notes on the paper and guessing wildly. With a good foundation, you can gather enough information to get that majority of a dictation correct and make educated guesses for those things that leave you begging for just one more listening.
Convinced? Grab your pencil and some paper, take a deep breath and let’s jump in.
Step 1. Read the clues and make a map of the upcoming melodic dictation.
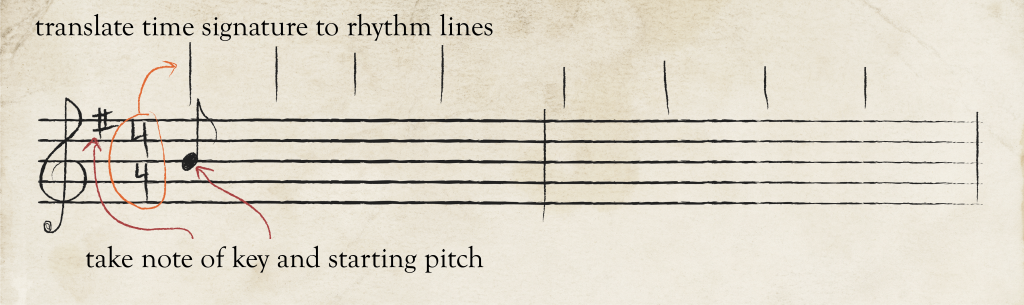
Before you even get to the dictation – take note of what you already know.
- Key signature
- Time Signature
- Starting pitch
- Possible ending pitches
- Notes of the scale in the key
- What are the “important notes”?
Consider this example. You are asked to take a dictation in G Major, 4/4, 2 measures, and you’ll begin with an eighth note on mi (scale degree 3, or b-natural). Begin by setting up your map. Draw your barlines, rhythm marks and starting pitch. Next, think through what you can expect to hear. What are your “important” pitches? You can use certain scale degrees as anchors – sol (5) and ti (7) are good ones to visualize before you get going. Also, think through a tonic triad (g-b-d) and a dominant V7 chord (d-f#-a-c). Make a mental note – or even sketch in on the staff – where these pitches occur.
Step 2. Take down the Rhythm before tackling the melody.
A solid rhythmic dictation is quite possibly the most important part of how to take a melodic dictation. The short summary is this – draw lines above the staff to mark each beat and mark in the rhythm as you go. Getting this skill down takes some practice. I like to count the sub-division and tap my foot to the beat while marking the rhythm.
After you have the rhythm, take a minute to translate it into note values above the staff and maybe even mark in a few things you noticed about the melody. Did you catch the ending pitch? Those 16th notes that you heard – did the move stepwise? This will set you up well for Step 3. BUT – don’t get overwhelmed if it takes you a couple of listenings to get through the rhythm and that’s all you get. Once you’ve got it, move on.
Step 3. Focus on the big picture of the melodic dictation.
For your first pass with the melody, get the first and last few notes and make note of the important landmarks. Mark down anything that sticks out to you. A bunch of notes in a stepwise pattern is often easy to grab, or maybe you hear a big leap that you’ll want to concentrate on later. Use the break between listenings to go through and make marks of these events.
Another way to focus on the big picture is to look for predictable harmonic patterns. Most melodies are built with some underlying chord progression in mind. At the very least there is a cadence at the end of it. There are a couple cadential patterns that will serve you well.
Dominant to Tonic is the most common. That will give you a feeling of completion at the end and you will often have Ti-Do (7-1) or Re-Do (2-1) in the melody.
Tonic to Dominant is the half cadence and that will feel like a question instead of a statement. For that cadence, the melody will end on sol (5) or re (2) – and every once in a while, on ti (7). Ti, however, is the most unstable pitch and will stick out like a sore thumb.
Step 4. Get the Details (as many as you can).
It’s important to pay attention to that parenthetical statement. Get what you can! Don’t get bogged down with getting every single note perfect. The best strategy here is often to figure out how the melody gets to certain landmarks.
Begin by writing down what you are fairly sure of. You may at this point have at least part of the melody memorized. Use a break between listenings to try singing it back and then write down what you think is there. Trust your first instinct, you’re better than you give yourself credit for!
If you know that there is a leap followed by a run and you don’t know the interval of the leap, but you do know where the run ends, then you can work backwards. If you are confident that the melody lands on sol, do, or ti (5, 1, 7) part way through, make note of that and figure out what is going on around it. These are the three most noticeable scale degrees and keeping track of where they occur will give you a structure that you can build around.
When in doubt, make educated guesses to fill in the rest. The more you practice, the better you’ll get at making these educated guesses.
Step 5. Check your work.
Always leave a listening at the end to double check what you have and fill in any gaps. Put down something in every spot. If you’re not sure of a pitch, but you know a rhythm, you will likely at least get credit for having the correct rhythm.
A final tip.
Finally, if you want to level up your game – it is incredibly helpful to learn moveable-do solfege and spend a bit of time every day practicing sight singing. Each syllable has a different role within the scale and listening for these tendencies can aid in filling in some gaps. If there’s one thing I can promise you – it’s that the more you practice sight singing, the better you will be at melodic dictation.
For more further study.
This doesn’t have to be the end of your journey! I have two avenues for you. The first is my Free Mini-Course: Three Tips for Melodic Dictation Success – why not sign up today?
The second is my YouTube series: A Dictation a Day, where I have a plenty of melodic dictation videos that you can watch to put your skills to the test. Here’s one video in particular that you can use to practice what you’ve learned!
Leave a Reply
You must be logged in to post a comment.