
How to take a Rhythmic Dictation
The ability to take a rhythmic dictation is at the core of melodic dictation skills. Without it, you will have no idea where to place pitches and can wind up with a jumble of pitches that, while they may be correct melodically, make no sense rhythmically and are therefore incorrect. The structure of a solid rhythm can give you a scaffolding for the dictation and thus the confidence to proceed with taking down the notes. Without this scaffolding, students are often lost and flummoxed by the third listening and wind up with their hands in the air and their head firmly planted face down in frustration on their desk!
Before you tackle a rhythmic dictation
The key to taking a proper rhythmic dictation is to develop a proper amount of ear, hand, foot coordination. Let’s start with foot coordination. To begin, practice tapping your foot along with your favorite songs. Tap to what you perceive as the strong beat. Once you are comfortable with that, add in counting – most likely, if it is a pop song, the count will be 1-2-3-4.
Rhythmic dictation of quarter notes (crochets)
Once you’ve got that basic sense of rhythm down, let’s try some ear-hand-foot-voice coordination. Before you begin, get a piece of paper and a pencil. To help you along, print or copy Worksheet 1 (link below). Each vertical line above the long horizontal line represents a quarter note, or the primary beat.
Click play below to start the recording. What you’re hearing is quarter notes (crochets). You will hear a low sound, which represents the primary beat, and a higher sound, which is the rhythm. For right now, they are the same rhythm.
Start by tapping your foot to the beat. As you are comfortable with tapping your foot, add in counting out loud: 1-2-3-4. Once you have the hang of it, use your pencil to make a mark on each vertical line with each beat. It doesn’t have to be tidy or perfect, you are training your hand to synch with your ear and using your foot to keep track of the beat. Keep counting out loud for now, even if it feels a bit silly. Having that verbal assurance is highly useful at this point.
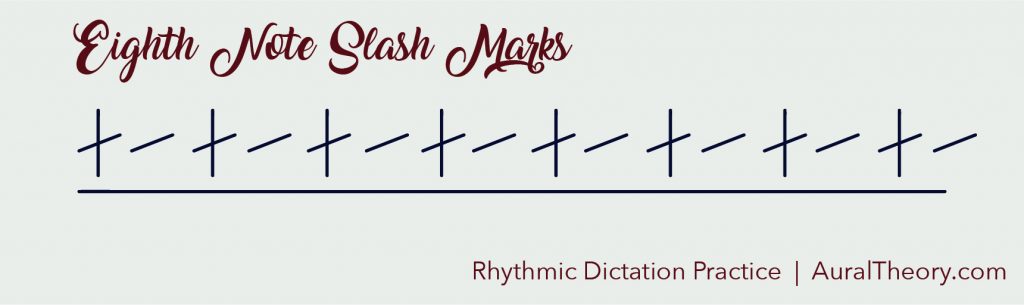
Eighth Notes (Quavers)
Now, let’s add in some eighth notes (quavers or ½ beat notes). Before beginning, print a fresh page of the pdf or copy it down to a clean piece of paper.
For the eighth notes, you’ll count out loud: 1-and-2-and-3-and-4-and (and then start over with 1). The marks for “and” will go halfway between the vertical lines. Here is how that looks on the page:
Start by playing this recording and tapping your foot to the low, primary beat. When ready, count out loud with the eighth notes (the high-pitched sound). So, your foot will keep track of the primary beat (1-2-3-4) and your voice will keep track of the subdivision (1-and-2-and-3-and-4-and). Once you feel comfortable with this, you can start to mark what you hear in the rhythm on the page. Take your pencil and mark each note as it happens.
Your goal is to write the mark as close as possible to when you hear the pitch. You want to synchronize your hand with your ears. This takes practice to master. Stick with this step until you are highly comfortable with it.
Strong Beats & Measures
So far, the recordings have had a solid string of quarter notes or eighth notes. In order to make rhythms and music more manageable, we have measures or bars (same thing!). There are all kinds of ways to organize the measures, but the simplest is by 4/4 meter. This means that there are 4 quarter notes in each measure – thus the count of 1-2-3-4.
Rhythms are often thought of in terms of strong beats and weak beats. In 4/4, the 1 is the strongest, 3 is semi-strong, and 2 and 4 are considered weak (…except in pop music, they’re often emphasized through what is called the back beat!). Take a listen to this recording – the eighth notes are the same as before, but the lower, primary beat has a strong 1, a semi-strong 3, and weaker 2 and 4. Try finding the strong beat and counting along with 1-and-2-and-3-and-4-and.
Practice Time
Finally, let’s try some rhythms that mix half notes (minims), quarter notes, and eighth notes. It’s time for you to reach a new level of coordination. You will keep tapping your foot to the primary beat (quarter note) and counting aloud with the subdivision (1-and-2-and-3-and-4-and), but now, you’ll be writing down a variety of note values.
There are four rhythms and each recording has 10 passes of the rhythm with a 12 second pause in between playings. Feel free to replay the recording as much as you need to get comfortable with it. Before starting, print the worksheet and make sure you have a pencil.
Rhythmic Dictation Steps
- COUNTING: Each rhythm will start with a 4-beat click. During this introduction, count 1-and-2-and-3-and-4-and as well as tap your foot to the quarter note beat.
- LISTENING: Listen to the rhythm once while counting along and tapping your foot. Don’t write anything down during this first listening. After you get more comfortable with the process, you won’t need this first time to listen, but it will prove helpful for now.
- MARKING: Make a mark on the vertical line above the staff where each note starts.
- CHECKING: Check your work by counting 1-and-2-and-3-and-4-and clapping the rhythm.
- TRANSLATION: Translate the marks into note values – assume that there are no rests. If you have trouble with this, think about how many beats take place before the next mark. For example, if you have a slash on beat one and then on beat three, that means that two beats take up the first slash mark – and what equals two beats? A half note.
Give it a try and then click below for the answers.
Rhythm 1:
Rhythm 2:
Rhythm 3:
Rhythm 4:
Did you find this article helpful? Would you like more helpful tips and tricks? If so, please share it with your friends and sign up for my mailing list below.
[mailerlite_form form_id=1]

Leave a Reply
You must be logged in to post a comment.